Browse: Home > alarm circuit > Touch Activated Alarm
Friday, July 6, 2012
Touch Activated Alarm
Parts List
R1 = 100K D1 = 1N4004, (or any other 1N4001,2,etc) general purpose diode
R2 = 4K7 C1 = 47uF/16V, electrolytic
R3 = 10M C2 = 0.1uF (100nF) ceramic
P1 = 100K IC1 = 555 Timer
Ry = Relay Q1 = 2N3904, 2N2222, or similar
Additional Notes
Not much to tell here as the circuit speaks for itself. The 555 can be almost any type, they are all pin-compatible. Although some CMOS types may not have enough power to drive the transistor, in that case use an ordinary 555. C1's working voltage should be increased to 25V if you decide to go with a 12V power source. Change the value of C1 for the desired output pulse.
For the timing use this equation: T=1.1*(R1+P1)*C1 assuming R1 + P1 = 150K, then select C1 as follows: C1 = 6uF for each 1-second pulse width. For example, if you want the pulse width to be 5 seconds, C1 should be 30uf or nearest value like 22 or 33uF. Additionally, P1 can adjust the rest.
Rule of thumb: the working voltage of capacitors are at least double the supplied voltage, in other words, if the power source is 9Volt, your capacitor(s) is at least 18V. Transistor T1 can be any approximate substitute. Use any suitable relay for your project and if you're not tight on space, use any size. I've build this particular circuit to prevent students from fiddling with the security cameras in computer labs at the University I am employed. I made sure the metal casing was not grounded. But as the schematic shows you can basically hook it up to any type of metal surface. I used a 12-vdc power source. Use any suitable relay to handle your requirements. A 'RESET' switch (Normally Closed) can be added between the positive and the 'arrow-with-the-+'. The trigger (touch) wire is connected to pin 2 of the 555 and will trigger the relay, using your body resistance, when touched. It is obvious that the 'touching' part has to be clean and makes good contact with the trigger wire. This particular circuit may not be suitable for all applications. Just in case you wonder why pin 5 is not listed in the schematic diagram; it is not really needed. In certain noisy conditions a small 0.01uF ceramic capacitor is placed between pin 5 and ground. It does no harm to add one or leave it out.
NOTE: For those of you who did not notice, there is an approximate 5-second delay build-in before activation of the relay to avoid false triggering, or a 'would-be' thief, etc.
AGAIN, make sure the latch (pin 2) is not touching anything 'ground' or the circuit just keeps resetting itself and so will not work. My shed has wooden doors so works fine. If you can't get yours to work, check the trigger input, verify there is some sort of signal coming from output pin 3, play with the value of R3/C1, etc.
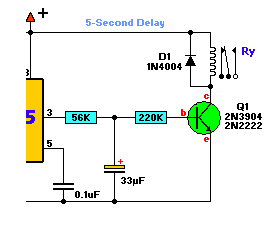
The original circuit, as submitted by W. Knight to Hands-on magazine, was as shown below. R2 is replaced by the two resistors and the 33uF capacitor for the delay.
Labels:
alarm circuit
Subscribe to:
Post Comments (Atom)
Popular Posts
-
Circuit diagram I use the lm10 IC because it has a reference voltage and that is useful for dc power supply. With two ICs can take d...
-
Circuit diagram How to calculate transformer rating The basic formula is P=VI and between input output of the transformer we have Power...
-
Low-cut and Bass controls Output power: 40W on 8 Ohm and 60W on 4 Ohm loads Amplifier circuit diagram: Amplifier parts: R1 6K8 ...
-
circuit diagram Parts: P1 22K Log.Potentiometer (Dual-gang for stereo) P2 100K Log.Potentiometer (Dual-gang for stereo) R1 820...


No comments:
Post a Comment